The complete building model
How the building model is created in Simulink
The data inserted by the user concerning the weather, the envelope elements and thermal zones of the building are collected in two MATLAB structures by means of the SAVE ALL DATA button of the ALMABuild main interface:
- weather data are collected in the “Ambient_Data” structure,
- all the information about envelope elements and thermal zones are collected in the “Building_Data” structure.
Then, the building model can be implemented in the Simulink desktop just by means of the CREATE THE MODEL command of the ALMABuild main interface.
Firstly, all the yearly calculations related to the evaluation of the incident solar radiation over a surface and of the shading factors are automatically performed and the obtained profiles are added to the “Ambient_Data” and the “Building_Data” structure, respectively. In this way, the computational effort, and consequently the time required for simulations is reduced, since shadings and solar radiation information needs only to be recalled as data and not evaluated time by time.
Then, by means of a series of m-files, the building model is implemented in the Simulink desktop, importing all the necessary blocks from both the Simulink and ALMABuild libraries, properly linking them and setting for each block the proper parameters, based on the data previously inserted by the user. In this way, the creation of the building model in the Simulink desktop is totally automatic, making the building modelling faster compared to a manual implementation and drastically reducing mistakes due to data insertion or block linking.
Moreover, it has to be highlighted that all the procedure for the building modelling with ALMABuild does not require any Simulink expertise of the user.
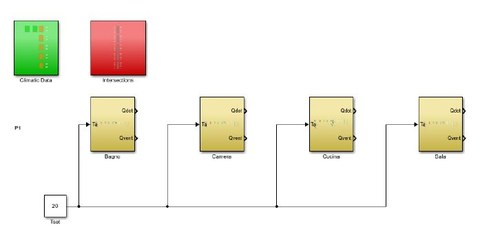
The complete model of a building, even if simple, is always obtained in the Simulink desktop by using a large number of blocks, that refer to the different building elements and to the climatic data, and wires by means of which the data are exchanged among the blocks. In particular, the “Climatic Data” block refer to the weather data of the selected location; the “Intersections” block allows to model the heat transfer across the envelope elements which separate different thermal zones; the remaining blocks, aligned for each floor, represent all the defined thermal zones, inserted with ALMABuild.
Every block is composed of subsystem blocks, that can be seen clicking twice on the block. For example, in the Thermal Zone subsystem, a series of blocks linked to the single envelope elements (walls, roof…) are used together with a block able to solve the thermal balance of the zone and the indoor temperature and the heat fluxes which are present in the thermal zone are calculated.
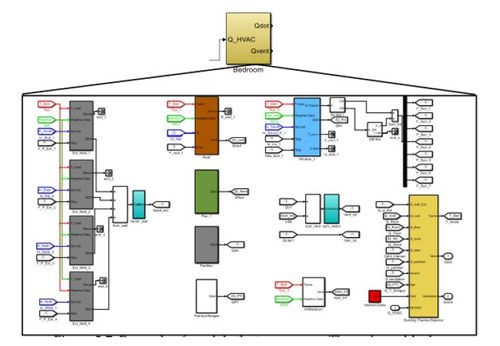
Every block is composed of subsystem blocks, that can be seen clicking twice on the block: for example, in the Thermal Zone subsystem, a series of blocks linked to the single envelope elements (walls, roof…) are used together with a block able to solve the thermal balance of the zone and the indoor temperature and the heat fluxes which are present in the thermal zone are calculated.
The simulation is started after having inserted the desired time stop (3600*20*365 for a year simulation) and clicking on the “Run” button. Before starting the simulation the “Ambient_Data.mat” and “Building_Data.mat” project file need to be open in the “Workspace” of MATLAB. In this way, the program performs all the calculations of the simulation but without showing the results. For this reason, it is necessary to create a “To Workspace” block, linked to the desired output, to save all the calculated data for each time step of the simulation, that will be shown on the MATLAB Workspace.